| 일 | 월 | 화 | 수 | 목 | 금 | 토 |
|---|---|---|---|---|---|---|
| 1 | 2 | 3 | 4 | 5 | 6 | |
| 7 | 8 | 9 | 10 | 11 | 12 | 13 |
| 14 | 15 | 16 | 17 | 18 | 19 | 20 |
| 21 | 22 | 23 | 24 | 25 | 26 | 27 |
| 28 | 29 | 30 | 31 |
- 개발자
- BottomNavigationView
- Binding Adapter
- android studio
- 안드로이드
- 주석
- Navigation Component
- Gradle
- fragment
- 면접
- Jetpack Compose
- recyclerview
- nav_graph
- room
- asLiveData()
- Datastore
- TypeConverter
- electron
- Livedata
- themes.xml
- 테마
- hilt
- 취업
- kotlin
- imageview
- ViewModel
- 스플래시
- Android
- Safe Args
- 일렉트론
- Today
- Total
나만 보는 일기장
[RecyclerView] Shimmer RecyclerView 쓰는 법 본문
    // Shimmer
    implementation 'com.facebook.shimmer:shimmer:0.5.0'

    // Shimmer RecyclerView
    implementation 'com.todkars:shimmer-recyclerview:0.4.1'
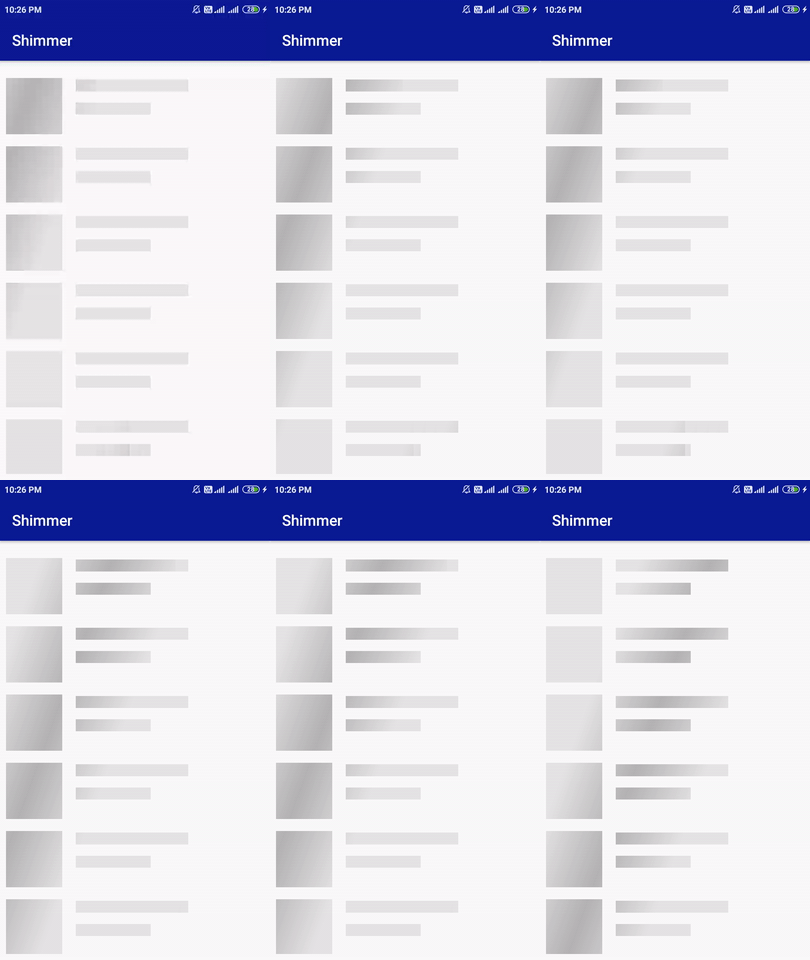
Shimmer는 콘텐츠를 불러오는 동안 placeholder로 표시하여 로딩 중임을 알 수 있게 하고, 콘텐츠의 구조를 대강 알려줄 수 있게 하는 라이브러리입니다.
사용법
1. Shimmer RecyclerView에 들어갈 아이템의 레이아웃을 만들어줍니다.

▽ 레이아웃 코드
<?xml version="1.0" encoding="utf-8"?>
<androidx.constraintlayout.widget.ConstraintLayout
    xmlns:android="http://schemas.android.com/apk/res/android"
    xmlns:app="http://schemas.android.com/apk/res-auto"
    android:layout_width="match_parent"
    android:layout_height="wrap_content"
    android:background="#CDCDCD"
    android:layout_marginHorizontal="10dp"
    android:layout_marginVertical="5dp">

    <View
        android:id="@+id/textId"
        android:layout_width="50dp"
        android:layout_height="50dp"
        android:layout_marginStart="24dp"
        android:background="@color/placeholder_gray"
        app:layout_constraintBottom_toBottomOf="@+id/textTags"
        app:layout_constraintStart_toStartOf="parent"
        app:layout_constraintTop_toTopOf="@+id/textTitle" />

    <View
        android:id="@+id/textTitle"
        android:layout_width="0dp"
        android:layout_height="25dp"
        android:layout_marginStart="20dp"
        android:layout_marginTop="24dp"
        android:layout_marginEnd="24dp"
        android:background="@color/placeholder_gray"
        app:layout_constraintEnd_toEndOf="parent"
        app:layout_constraintStart_toEndOf="@+id/textId"
        app:layout_constraintTop_toTopOf="parent" />

    <View
        android:id="@+id/textTags"
        android:layout_width="160dp"
        android:layout_height="17dp"
        android:layout_marginTop="5dp"
        android:layout_marginBottom="24dp"
        android:background="@color/placeholder_gray"
        app:layout_constraintBottom_toBottomOf="parent"
        app:layout_constraintStart_toStartOf="@+id/textTitle"
        app:layout_constraintTop_toBottomOf="@+id/textTitle" />
</androidx.constraintlayout.widget.ConstraintLayout>
2. 레이아웃에 Shimmer RecyclerView 추가
<com.todkars.shimmer.ShimmerRecyclerView
            android:id="@+id/shimmerView"
            android:layout_width="0dp"
            android:layout_height="0dp"
            android:layout_marginTop="10dp"
            android:orientation="vertical"
            app:layout_constraintBottom_toBottomOf="@+id/swipeRefreshLayout"
            app:layout_constraintEnd_toEndOf="parent"
            app:layout_constraintStart_toStartOf="parent"
            app:layout_constraintTop_toBottomOf="@+id/searchView"
            app:shimmer_recycler_item_count="8"
            app:shimmer_recycler_layout="@layout/post_list_placeholder" />
레이아웃의 적절한 위치에 ShimmerRecyclerView를 추가해주고, app:shimmer_recycler_layout 속성으로 방금 만든 아이템의 레이아웃을 추가해주고 app:shimmer_recycler_item_count 속성으로 Shimmer RecyclerView에 표시될 아이템의 수를 지정합니다.
이 외에도 많은 속성이 있는데, 자세한 내용은 아래 링크를 참고하시길 바랍니다.
GitHub - omtodkar/ShimmerRecyclerView: A custom Shimmer RecyclerView which adopt to list / grid transition automatically and als
A custom Shimmer RecyclerView which adopt to list / grid transition automatically and also supports multiple view types while shimmering. - GitHub - omtodkar/ShimmerRecyclerView: A custom Shimmer R...
github.com
여기까지 하면 세팅은 끝이 나고, 액티비티나 프래그먼트에서 Shimmer RecyclerView의 .showShimmer() 함수와 .hideShimmer() 함수를 통해 컨트롤해주면 됩니다.


