| 일 | 월 | 화 | 수 | 목 | 금 | 토 |
|---|---|---|---|---|---|---|
| 1 | ||||||
| 2 | 3 | 4 | 5 | 6 | 7 | 8 |
| 9 | 10 | 11 | 12 | 13 | 14 | 15 |
| 16 | 17 | 18 | 19 | 20 | 21 | 22 |
| 23 | 24 | 25 | 26 | 27 | 28 | 29 |
| 30 |
Tags
- BottomNavigationView
- Livedata
- 테마
- imageview
- 스플래시
- 일렉트론
- recyclerview
- 개발자
- ViewModel
- fragment
- Android
- Gradle
- 주석
- 취업
- Jetpack Compose
- nav_graph
- 안드로이드
- kotlin
- hilt
- Navigation Component
- room
- TypeConverter
- 면접
- Datastore
- asLiveData()
- android studio
- Safe Args
- Binding Adapter
- themes.xml
- electron
Archives
- Today
- Total
나만 보는 일기장
[Jetpack Compose] LazyColumn을 통한 리스트 구현 본문
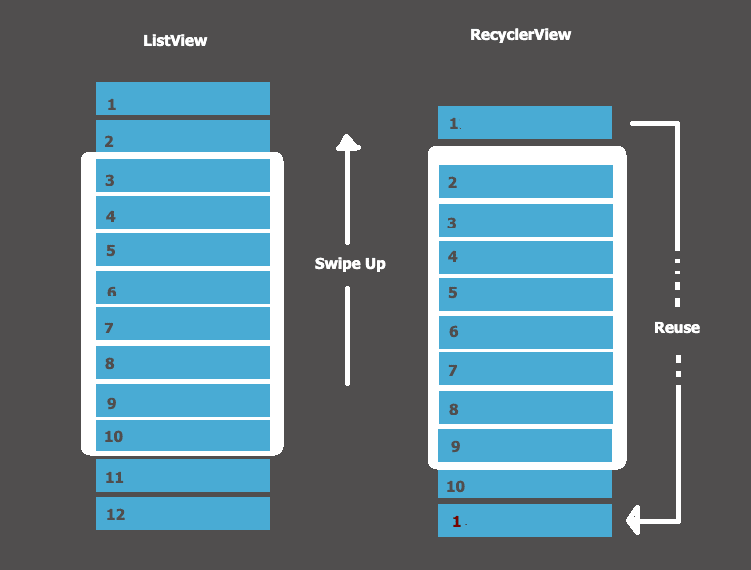
Xml 기반 레이아웃 작업에서의 ListView와 RecyclerView처럼
Compose에서는 for문을 통한 수동적인 리스트와 LazyComlumn(이나 LazyRow)를 이용한 리스트가 있습니다.

둘의 차이점 또한 똑같습니다. ListView와 수동 리스트가 리스트의 아이템 전체를 로드해 화면에 보이지 않는 부분은 자원이 낭비되고, RecyclerView와 LazyColumn은 화면 밖을 벗어난 아이템을 재활용해 효율적이라는 점입니다.
@Composable
fun MainScreen(userProfiles: List<UserProfile>) {
    Scaffold(topBar = { AppBar() }) {
        Surface(
            modifier = Modifier.fillMaxSize()
        ) {
            Column {
                for(userProfile in userProfiles)
                    ProfileCard(userProfile = userProfile)
            }
        }
    }
}
오늘은 위와 같이 for문을 사용해 구현했던 리스트를 LazyColumn으로 바꿔보겠습니다.
@Composable
fun MainScreen(userProfiles: List<UserProfile>) {
    Scaffold(topBar = { AppBar() }) {
        Surface(
            modifier = Modifier.fillMaxSize()
        ) {
            LazyColumn {
                items(userProfiles) { userProfile ->
                    ProfileCard(userProfile = userProfile)
                }
            }
        }
    }
}
끝~~
LazyColumn의 LazyListScope 내부에 items() 함수를 추가하고, items() 함수에는 리스트를 추가한 후 람다로 리스트의 아이템을 사용하는 Composable을 넣어주면 됩니다.
'개발 > Android' 카테고리의 다른 글
| [TextView] 문자열 리소스를 통해 Html 스타일과 서식을 같이 사용하는 방법 (0) | 2022.03.08 |
|---|---|
| [Retrofit] Header Interceptor 추가 (0) | 2022.03.02 |
| [Android Studio] - Bumblebee 업데이트 내역 (0) | 2022.01.26 |
| [Jetpack Compose] LiveData를 State로 observe 하기 (0) | 2022.01.13 |
Comments


